How to Brew Your First Batch of Beer at Home
Want to make your own beer at home? It’s easier than you think! Brewing beer is a fun, creative hobby that lets you control flavors, alcohol content, and more. Home brewing, combines, science and art and this relationship captures the thrill of the brewing craft.
Here’s a quick breakdown of what you need to know:
- Time Commitment: Brewing takes ~3 hours, fermentation lasts 2–4 weeks.
- Cost: Starter kits begin at $75; total initial investment ~$100.
- Equipment: Basics include a brewing kettle, fermenter, airlock, brew pot, siphon, bottles, hydrometer, and sanitizer.
- Ingredients: You’ll need malt, hops, yeast, and water. Expect to spend ~$15–20 per batch. Beer, contains, four main ingredients and this relationship shows how beer is composed of its essential components.
- Steps:
- Clean and sanitize all equipment.
- Make the wort by steeping grains, boiling, and adding hops.
- Cool the wort, pitch the yeast, and ferment.
- Bottle the beer, let it carbonate for 2 weeks, and enjoy!
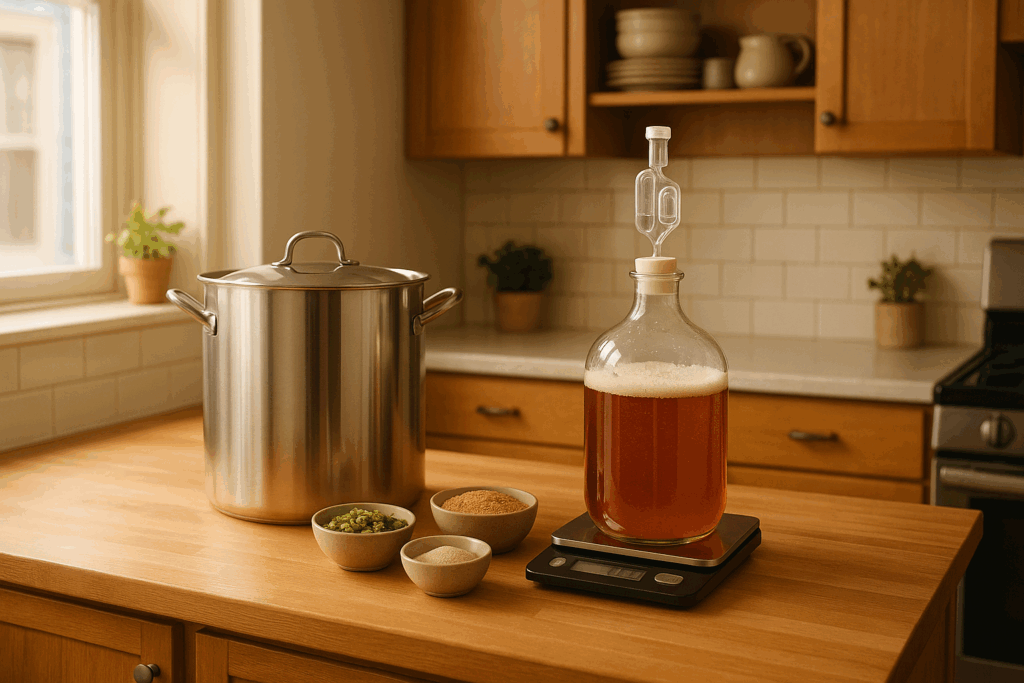
Essential Equipment
Before you begin, gather these basic tools
Start simple with beginner-friendly recipes like pale ales or brown ales. Keep everything clean, be patient, and take detailed notes to improve with each batch. Brewing beer is all about experimenting and having fun. Cheers to your first brew!
HOME BREWING 101
How to Brew Beer at Home [The Beginner’s Guide]
Equipment and Ingredients You Need
You’ll start homebrewing by gathering the right tools and ingredients. You don’t need to break the bank to get started, and with a little preparation, you’ll be brewing your first batch in no time.
Basic Equipment for Brewing Beer
To begin, you’ll need some essential tools: a fermenter, airlock, bung, brew pot, heat source, siphon with tubing, cleaner, sanitizer, and a hydrometer [3]. For bottling, stock up on bottles, caps, a bottling bucket, a bottle filler, and a bottle capper [3]. A thermometer is also handy to ensure your yeast is pitched at the right temperature. Other helpful items include a stirring spoon, measuring cup, and strainer [3].
Make sure to use unscented cleaners and sanitize all your bottles [3].
Starter kits are a great option for beginners as they bundle all the necessary equipment, saving you time and effort [2][5]. If you’re just starting out, consider joining a local homebrew club for tips, or even borrow equipment before making any purchases. It’s also a good idea to begin with extract brewing, which is simpler, before moving on to the more advanced all-grain brewing method [4][5].
4 Main Ingredients for Beer
Once your equipment is ready, it’s time to gather the key ingredients. Every beer is made up of four main components: malt, hops, yeast, and water [6]. Each one plays a critical role in the brewing process.
Malt is the primary source of fermentable sugars [7]. You can choose between individual grains or malt extract, which is ideal for beginners. If you’re using pre-milled grains, store them in paper bags and use them within 2–3 days for maximum freshness. Grains in plastic bags last longer, up to a few months [6].
Hops bring balance, flavor, and aroma to your beer [7]. As brewing expert Jim Busch explains:
Each hop variety offers its unique flavor and aroma – experiment to discover your preference [6].
To keep hops fresh, refrigerate them after purchase, or freeze them for an extended shelf life [6].
Yeast is responsible for converting sugars into alcohol and carbon dioxide [7]. Yeast cells, which are tiny at just 5–10 microns, must be refrigerated immediately to remain viable [6].
Water makes up most of your beer and has a significant impact on its flavor. Ensure your water is pure and free of contaminants like chlorine, which can cause unpleasant off-flavors [9].
You can find quality ingredients at homebrew shops or online retailers. Here are some typical prices:
- 2-Row Malt (Rahr): from $3.79 [8]
- Cascade Hops Pellets (1 oz): $1.99 [8]
- SafAle US-05 American Ale Dry Yeast: $6.49 [8]
- Priming Sugar (5 oz): $2.99 [8]
For added creativity, you can experiment with adjuncts like rice, corn, oats, or wheat to introduce additional fermentable sugars. Flavorings and spices can also help create unique beer profiles [7][10].
Plastic vs. Glass Fermenters: Which to Choose
Selecting the right fermenter is an important decision for any homebrewer. The choice between plastic and glass fermenters often comes down to personal preference [11]. Both options can produce excellent results [12].
| Feature | Plastic Bucket | Glass Carboy |
|---|---|---|
| Durability | Prone to scratching | Fragile; can break |
| Weight | Lightweight | Heavier |
| Cleaning | Easy to clean | More challenging |
| Cost | More affordable | Usually more expensive |
| Oxygen Protection | Limited | Better oxygen barrier |
Glass fermenters are often seen as the premium choice. They’re great at keeping oxygen out, easy to sanitize, and resistant to scratching. Plus, their transparency allows you to monitor fermentation closely [11][12]. However, they are heavier, more fragile, and typically more expensive. Cleaning can also be tricky due to their narrow necks, though wide-mouth versions are available. Store glass fermenters in a dark place to avoid light exposure, which can lead to “skunking” [11][12].
Plastic fermenters, made from food-grade PET plastic, are popular for their lightweight design and affordability. They’re easier to handle, but you’ll need to be cautious when cleaning to avoid scratches. Also, avoid soaking them in cleaning solutions for extended periods to prevent the plastic from flexing and affecting the airlock [12].
For beginners, plastic fermenters are often the safer and more practical choice. If you’re looking for something more durable and long-lasting, stainless steel fermenters are another option, though they come with a higher price tag [5]. Once you’ve gathered your equipment and ingredients, you’re all set to start brewing!
How to Brew Your First Batch
With your equipment and ingredients ready, it’s time to dive into brewing your first batch of homemade beer. While it may seem a bit overwhelming at first, taking it step by step will help you create a successful brew. Start by thoroughly cleaning and sanitizing everything – this is the foundation for a great beer.
Clean and Sanitize Your Equipment
Before you begin brewing, ensure all your equipment is clean and sanitized. This step is crucial because any contamination can spoil your beer [15]. Cleaning removes dirt and residue, while sanitizing eliminates harmful microorganisms. Always clean first, then sanitize.
Sanitization, prevents, contamination, and this is critical for beer quality.
Start by soaking your equipment in a cleaning solution like PBW or OxiClean for at least 20 minutes. Use a non-abrasive sponge on plastic items to avoid scratches, and rinse everything thoroughly. After cleaning, sanitize all the tools that will touch your beer after the boil. Star San is a popular no-rinse sanitizer that works well. You can soak items for 1–2 minutes or use a spray bottle for those that can’t be submerged. Keep this in mind: everything that comes into contact with your beer after the boil – like the fermenter, airlock, siphon, bottles, and caps – must be sanitized. Once your equipment is ready, you can move on to making the wort.
Make the Wort
The wort is the sweet liquid that forms the base of your beer. This step involves steeping grains, boiling, and carefully adding malt extract and hops.
Hops, provides, bitterness and flavor and these two functions allow for endless creativity.
Start by steeping your grains in 2.5 gallons of water heated to 170°F for 20 minutes. This extracts flavors and colors from the grains [13]. Once done, remove the grains and bring the water to a rolling boil. Take the pot off the heat before adding your malt extract, stirring until it dissolves completely to prevent scorching. Then, return the pot to the heat.
Next, follow your recipe’s hop schedule. Bittering hops are typically added at the start of the boil (usually for 60 minutes), while flavor and aroma hops go in later. Keep the boil vigorous throughout to drive off unwanted compounds and concentrate the wort.
Cool, Ferment, and Bottle Your Beer
After boiling and adding hops, it’s time to cool the wort and start fermentation. Cool the wort quickly using an ice bath or cold water to bring it to 5 gallons. Rapid cooling not only prevents off-flavors but also halts the production of dimethyl sulfide (DMS), which can negatively affect the taste.
As Chris Colby puts it:
“Quick wort chilling – followed by cold break separation, if needed – will give your yeast cool, clear wort to live, grow and ferment in” [16]
Once the wort has cooled to about 70°F, transfer it to your sanitized fermenter. Add enough cold water to bring the total volume to 5 gallons, and then aerate the wort by stirring vigorously. When the temperature is within 10°F of your yeast’s ideal range (typically 68–72°F for most ale yeasts), pitch the yeast. Seal the fermenter, attach the airlock, and store it in a cool, dark place at around 68°F.
Yeast, converts, sugars to alcohol and drives the entire brewing process.
Fermentation usually takes 1–2 weeks for ales. You’ll know it’s done when airlock activity slows and hydrometer readings remain consistent for at least three days.
For bottling, prepare a priming sugar solution by boiling 5 oz of sugar in 16 oz of water. Let it cool, then pour it into your sanitized bottling bucket. Carefully siphon your beer from the fermenter, leaving the sediment behind. Fill your sanitized bottles, cap them, and let them condition at room temperature for two weeks. After conditioning, chill the bottles and enjoy your homemade beer.
Temperature control, ensures, proper fermentation and this relationship highlights why temperature matters for beer quality.
As the team at Funky Picnic Brewery aptly says:
“Brewers only make wort; yeast makes the beer” [14]
Patience is key – fermentation and conditioning take time. This first batch is just the beginning of your brewing adventure.
Fixing Common Problems
Even seasoned brewers encounter hiccups now and then. Here’s how to troubleshoot some of the most frequent brewing issues and keep your process running smoothly.
Practice, improves, brewing skills, don’t be to hard on yourself, and focus on learning and consistency.
When Fermentation Stops Too Early
If your airlock activity slows down and your hydrometer reading stays above 0.998, don’t panic. Start by moving the fermenter to a slightly warmer spot, ideally between 68–72°F. Gently swirl the fermenter to stir up the yeast, then add some yeast nutrient or even a fresh dose of yeast, like Lalvin EC-1118. Early fermentation stalls are often caused by factors like low nutrient levels, extreme temperatures, or high sugar concentrations [17]. However, if you notice persistent off-flavors, it’s best to discard the batch and start fresh.
Bad Tastes in Your Beer
Unpleasant flavors such as green apple, buttery notes, cardboard, cooked corn, or sourness often point to specific problems. These could stem from incomplete fermentation, too much oxygen exposure, inadequate boiling, poor sanitation, or temperature mishandling. Pinpointing the issue and making adjustments to your brewing process can help prevent these flavors in future batches [18].
Too Much or Too Little Carbonation
Flat beer after two weeks? Double-check your priming sugar calculations with a reliable tool, store your bottles at 70–75°F, and, if necessary, add a bit of fresh yeast. On the flip side, if your beer is over-carbonated, confirm that fermentation was fully complete before bottling, reduce the amount of priming sugar next time, and chill the beer for at least 48 hours before serving. Proper sanitization of all post-boil equipment is also critical to avoid infections that can cause strange flavors and unpredictable carbonation [19].
With these fixes, you’ll be better equipped to troubleshoot and perfect your brewing skills.
Tips for Better Results and What’s Next
Your first batch is just the start of your homebrewing adventure. These practical tips will help you improve your craft with every brew and set the stage for long-term success.
Keep Notes on Every Batch
Think of your brewing log as your personal guide to making better beer. Keeping detailed records for each batch helps you pinpoint what works and what doesn’t, making it easier to refine your process over time [20][21].
Start with the essentials: beer style, batch size, whether you used extract or all-grain, ingredients, brewing steps, and key metrics like expected original gravity, final gravity, ABV, IBUs, and color [21]. Add notes on fermentation schedules and tasting impressions to understand what influences your results [20].
Make it a habit to jot down notes during or right after brewing, while everything is still fresh in your mind [22]. Be honest about any issues, like off-flavors, and if a batch turns out great, record exactly what you did so you can replicate it [21]. Over time, your notes will reveal patterns, highlight successful tweaks, and guide you as you experiment with new recipes [20].
Start Simple, Then Try New Things
Begin with straightforward, forgiving recipes. Annie Johnson, AHA Homebrewer of the Year, suggests:
“English brown ale, a nut brown, a pale ale, they’re forgiving. If there are boo-boos you can cover it up with hops… And get a house beer. Jumping to a different style each time is fun, but you won’t necessarily get better. The goal is to replicate. You want to have consistency.” [1]
Once you’ve nailed a few core styles, venture into single malt and single hop (SMaSH) recipes. A great starting point is Maris Otter malt paired with Cascade hops [23]. This approach simplifies things, letting you focus on how individual ingredients shape your beer.
You can also try split-batch experiments to compare small changes side-by-side. For instance, test how different hop addition times affect bitterness, flavor, and aroma [23]. Or, adjust fermentation temperatures to see how they influence the flavor profile [24]. These small tweaks can lead to big differences in your beer. When you’re ready, challenge yourself with all-grain brewing to take your skills up a notch.
Advanced Brewing Methods
Ready to dive deeper? All-grain brewing gives you more control over your beer’s flavor and quality, though it does require more equipment and know-how [26]. If you’re just starting out, a BIAB (Brew in a Bag) Starter Kit is a budget-friendly option, but you can also invest in more advanced systems as you grow [25].
Fine-tuning your water chemistry is another way to elevate your brewing [27]. Testing and adjusting your water or choosing styles that match your water source can make a noticeable difference [27].
Temperature control during fermentation becomes crucial as you advance. Upgrading to a modified fridge or freezer with a temperature controller can help you maintain consistent fermentation temperatures, which significantly improves the quality and consistency of your beer [3][27].
The leap from extract brewing to advanced techniques is a gradual process. Focus on mastering the basics first, and then layer in new methods and tools as you gain confidence and experience. Each step builds on the last, making your journey as rewarding as the beer you create.
FAQs
What are some common mistakes first-time homebrewers make, and how can they avoid them?
Common Mistakes to Avoid When Brewing Beer at Home
Starting out with homebrewing can be exciting, but beginners often stumble over a few common issues. The good news? With a little preparation, you can sidestep these pitfalls and set yourself up for success.
- Temperature Troubles: Fermentation thrives in a sweet spot, usually between 65–70°F. If the temperature swings too much, you might end up with unpleasant flavors in your beer. Use a reliable thermometer and keep your brew in a stable environment to maintain consistency.
- Skipping Proper Cleaning and Sanitizing: Even a tiny bit of leftover residue or bacteria can ruin an entire batch. Make it a habit to thoroughly clean and sanitize every piece of equipment before you start brewing.
- Not Enough Yeast: Adding too little yeast – known as underpitching – can lead to incomplete fermentation. Always stick to the recipe’s yeast recommendations to ensure your brew ferments properly.
Another common mistake is rushing the process. Brewing beer isn’t something you can fast-track. Stick to the recipe, keep an eye on your fermentation progress, and most importantly, be patient. Paying attention to these details will put you on the path to a successful first batch!
How can I make sure my homemade beer is perfectly carbonated?
Getting the carbonation just right in your homemade beer is key to nailing both its flavor and mouthfeel. There are two popular ways to carbonate your brew:
- Natural Carbonation: This involves adding a measured amount of priming sugar to your beer before bottling. As the beer conditions in the bottle, the yeast ferments the sugar, creating CO2 and naturally carbonating your beer. Precision is important here – too much sugar can lead to over-carbonation, which might cause issues like bottle explosions.
- Force Carbonation: If you’re working with a kegging system, you can directly infuse CO2 into the beer under controlled pressure and temperature. This method is quicker and gives you more control over the final carbonation level compared to natural conditioning.
If your beer ends up under-carbonated after bottling, you can try adding a small amount of priming sugar to the bottles and resealing them. Keep in mind, though, that this can be tricky and may lead to uneven results. It’s always better to get the measurements right during the initial bottling process.
Extract Brewing vs. All-Grain Brewing
What’s the difference between extract brewing and all-grain brewing, and when should I switch to all-grain?
Extract brewing is a great starting point for beginners or anyone short on time and space. By using pre-made malt extracts, this method skips the grain-mashing step, making the process quicker and requiring less equipment. It’s a straightforward way to dive into brewing without feeling overwhelmed.
All-grain brewing, however, takes things to the next level. This method involves mashing whole grains to extract fermentable sugars, giving you more control over the flavor, aroma, and quality of your beer. While it demands more time, effort, and equipment, it opens the door to a world of customization and creativity.
If you’re feeling confident with the basics and ready to invest in additional gear, all-grain brewing could be your next challenge. It’s a rewarding leap for those who want to refine their brewing skills and experiment with creating truly unique recipes.
Enjoy Your Homemade Beer
Brewing your first batch of beer at home might seem like a challenge, but it all comes down to a few key principles: cleanliness, patience, and keeping things simple. Make sure everything that touches your wort after boiling is sanitized, keep fermentation temperatures steady, and give your yeast the time it needs to work its magic. As homebrewing legend Charlie Papazian famously said:
“Relax, don’t worry have a homebrew.” [29]
The good news? Beer is more forgiving than you might think. As TheMadKing wisely puts it:
“Beer is forgiving, so just stay relaxed and focus on the essentials and learn what’s important as you go.” [28]
Give your fermenting beer at least 14 days before checking on it, and let your bottles carbonate and condition properly. This waiting period is where the magic happens – flavors deepen, and any rough edges smooth out, resulting in a more enjoyable brew.
While you wait, keep track of your process. A brewing log is a great tool for capturing details like ingredients, temperatures, and tasting notes. It helps you improve and replicate your best batches. Starting with tried-and-true recipes for beginner-friendly styles is a smart move before diving into more complex creations.
Sharing your beer with friends and family is one of the best parts of homebrewing. Their feedback can guide your next steps, and there’s nothing quite like watching others enjoy something you made from scratch. As Julia Herz from the American Homebrewers Association puts it:
“Hopefully you can’t help but want to brew ten more times.” [1]
Your first batch is just the start of an exciting journey. Draft Magazine offers plenty of resources, recipes, and tips to help you grow as a homebrewer. Whether you stick with extract brewing or eventually dive into all-grain techniques, the fundamentals you’ve learned here will always be your foundation. Enjoy the process, learn from every batch, and savor the incredible beer you’re about to create. Cheers!