Cleaning Beer Bottles Is as Fun as Drinking Now! Here’s a Guide How
 Cleaning beer bottles can be as fun as drinking now. Although not a popular task, it surely is essential, considering no one wants gallons of sour infected beer in the drain.
Keeping things clean while brewing is often overlooked but, as with most simple things in life, it is the smallest task of cleaning and sanitizing that can have the biggest impact on homebrewing. With this thought in priority, here is a guide covering the best tools and equipment, along with a detailed step-by-step plan on how to clean beer bottles.
Bottle Cleaning Basics
Homebrewing has seen a burgeoning trend in recent times. Out of all the things required for home brewing, sterilizing beer bottles tops the checklist.
One of the most crucial decisions a homebrewer has to make is sourcing the beer bottles. Although the homebrew stores sell new ones, they certainly aren’t cheap. Paying for bottles that are already lying around at your place is not economical.
Recycling the used bottles is a sustainable option providing clean used bottles, which are just as good as new and, most importantly, come for free. If you settle on this alternative, there are a few basics about cleaning and sanitizing beer bottles that you need to know:
– The Importance of Cleaning in Homebrewing
Cleaning is an indispensable task in homebrewing. The bacteria are microscopic, so it becomes easy for them to hide in any part of the silhouette of the beer bottle. If you don’t scrub the used bottles, the leftover yeast sediments over time infect your freshly brewed batch.
Any insignificant amount of residue is enough to spoil the flavor profile of your beer by intervening with the yeast strain.
This is why you need to clear all the traces of bacteria and residue of the previous batch from your beer bottle.
– Cleaning vs. Sanitizing
The words cleaning and sanitizing are often used interchangeably, but these terminologies are not exactly synonymous. The cleaning process comes before sanitizing. Cleaning gets your bottles to the stage of no visible dirt, and sanitizing reduces invisible bacteria to save your new batch.
Cleaning involves scrubbing and has more to do with removing dirt and other foreign materials that can infect your new batch of beer, whereas sanitizing involves killing the bacteria found on the surface of an already cleaned bottle. That means when we sanitize beer bottles, we are actually disinfecting them.
– Required Time
One downside of cleaning beer bottles that many homebrewers face is the slow-moving process. The entire process takes about one to two hours when done with a dishwasher and two to three hours while washing by hand.
Important Tips Before Beginning the Cleaning Process
Cleaning and sanitizing beer bottles is a very complex task, considering the success of your new batch depends on it. Therefore, you need to take precautions even before you start with the cleaning process. Here are some tips for you:
- A relevant buying tip is opting for brown beer bottles. Purchasing new beer bottles is a long-term investment for many homebrewers. Since recycling is your decided window, opting for brown beer bottles instead of clear ones is economical. The reason behind this is the brown color protects the beer from direct sunlight and, thus, from the proliferation of harmful bacteria.
- An ideal start to streamline the cleaning process will be to wash the bottles straight away with warm water several times as soon as you pour the beer. If you leave the bottle sitting for days on your counter, bacteria will colonize your bottle.
- Using sterile tools and equipment for the cleaning process is as important. The goal for homebrewers is to clean the bottles as thoroughly. During this, if the tools are not clean, the rest of the process will be a waste.
- Typically, home brewers utilize things already available in their house for cleaning rather than investing in appropriate tools, leading to inadequate cleaning. Avoid making this mistake and avail tools and products that can render you the best of results.
- There are several methods at your disposal when it comes to cleaning bottles for homebrewing. Make sure you pick the cleaning method that suits your convenience.
- Lastly, do not rush the cleaning process. All your efforts can be ruined by your speeding.
Essential Cleaning Tools and Products
After picking the suitable cleaning method, now is the time to find the appropriate tools and equipment that complement your cleaning process. Picking the right products like a proper brush or cleaning solution can go a long way in saving you plenty of time. Here is a list of all the commonly required cleaning products:
– Bottle Brush
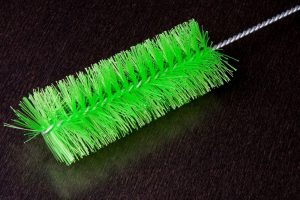
A long bristle brush can be inserted easily to reach the bottom and neck of the bottle to remove dirt and other build-ups.
– Oxygen Cleaner
Oxygen cleaners work best in low temperatures to break down the organic material required for soaking the bottles.
– Bottle Tree or Any Rack
A bottle tree is a tree-like structure used to drain the bottle after the wash. This does not take up space and allows multiple bottles to dry. If you don’t think you need this, you can simply dry the bottles on any rack.
– A Steel Wood Pad or Abrasive Dishcloth
You will require a steel wood pad to scrub off the remaining label and glue on the bottle.
How To Clean Beer Bottles
 Cleaning bottles for homebrew is not a difficult task in general. It all comes down to finding the correct method that will complement your convenience. Here is a detailed guide that provides you with the best way to clean beer bottles, both regular and narrow neck ones:
– Step I: Let the Soaking Begin
Once you have enough used bottles to clean, and it’s finally time, begin by soaking them overnight in a cleaner solution. Generally, OxiClean is the common consensus amongst the homebrewers, but any other generic version readily available in dollar stores works too. If you don’t own a large container, you can use your guest room bathtub for the soaking.
If you have sensitive hands, use gloves to protect your hands from the harshness of oxygen cleaner.
- Fill the container or the tub, whatever you are using, with a few inches of hot water and add two to three scoops of your preferred choice of cleaner in it. But remember, the best cleaner is that which is capable of breaking the organic materials. The amount of cleaner is completely dependent on the size of your tub or container, but a standard amount will be to make the water slippery.
- Once the cleaner is diluted and mixed thoroughly, start filling the bottles with this water solution. Now run the water to submerge the bottles in water. Leave the bottles overnight.
– Step II: Clean With a Brush
Throw away half of the poured water from the bottle, plug your finger at the opening and shake the bottle vigorously. After this, throw away the entire water of the bottle. The shaking ensures every remaining particle of dirt settled in the bottom is drained.
Now grab a long bottle brush and insert it inside the bottle to brush the insides. This step ensures that the brush gets all the dirt that was softened in the soaking. A long brush works best for narrow neck bottles with deeper residuals.
Once you are done with this thorough cleaning, rinse the bottles.
– Step III: Time To Remove the Labels
It’s time for the labels to come off. For this step, you will need:
- a scouring dishcloth or a steel wood pad
- a chair
- a trash can to dispose of the labels
- a pair of gloves.
Your first try should be to peel off the labels with your fingers since the overnight soaking in solution tends to make the labels come off easily. If not, you can use either the dishcloth or wool pad, dip it in water to scrub the stubborn ones.
Once you are done with it, throw the labels in the dustbin and remove the remaining glue, if any, on the bottle. If the label is printed on the bottle, you will have to apply a paint removal chemical to get rid of the label.
Once this is done, rinse the bottles inside out.
– Step IV: Sanitize Beer Bottles
After a thorough cleaning, you need to sanitize beer bottles. There are two ways to do this step: either by a commercial solution or through a dishwasher.
1. By Dishwasher
If you have a fully functioning dishwasher, you are in luck. Dishwasher makes this step a lot easier.
- All you need to do is put the rinsed bottles in and do a high-temperature wash and dry with no use of dish soap or detergent. You can fit nearly 55 bottles at one time. This wash has to be high-temperature to kill the bacteria.
- Let the bottles cool down for 10 minutes before taking them out. Place them on an upside-down rack and let them drip dry.
When it comes to dishwashers, they can only be relied on for outside cleaning. There is no guarantee that it will remove stubborn inside stains. Therefore, it is advisable to first clean the bottles by hand and then sanitize beer bottles in the dishwasher.
2. By a Bleach Solution
For this step, you will need to rinse the same tub or container you used initially to clean the bottles.
- Add hot water along with one tablespoon of bleach solution of your choice per gallon.
- Now soak the bottles in this water solution for about 20 minutes.
- After the soaking is done, you will need to wash the bottles with boiled water. Boiling water is used as a safety measure to kill germs and bacteria. You can also use tap water to rinse them.
- Now you need to dry the bottles. You can use a bottle tree rack for this or any other rack-like structure to dry the bottles. Do not forget to keep them upside down.
- Once you are through the sanitization process by dishwasher or by bleach solution, store your bottles in a container with no possible trace of dirt or dust.
You can now start brewing your beer!
Things To Keep In Mind
While all focus is on the bottles, the caps are often overlooked in terms of cleaning. Do not forget to clean and sanitize bottle caps.
Dish soaps or ordinary detergents can leave traces inside of the bottle and a film on the outer silhouette of beer bottles that cannot be rinsed off completely.
Another problem can be the odor of the dish soap. The presence of a floral perfume or any other odor can intervene with your home-brewed beer. Therefore, it is advisable to use proper cleaning agents.
Avoid using equipment made of plastic. This material becomes the perfect house of yeast and bacteria growth.
FAQ
Does baking soda clean beer bottles?
Baking soda can be used to clean beer bottles, as it can help remove stubborn residue and neutralize odors. However, it may not be effective at sanitizing the bottles, which is important to prevent contamination during the brewing process. It’s recommended to use a specialized brewing cleaner and sanitizer for best results.
Does dishwasher sanitize beer bottles?
A dishwasher can sanitize beer bottles, but it’s not recommended as it may not effectively remove all residue and can damage the bottles. It’s best to sanitize bottles with a specialized brewing cleaner and sanitizer.
How do you get rid of cloudy bottle nipples?
To clear cloudy bottle nipples, soaking them in a solution of equal parts water and white vinegar for a few hours can help.
Endnote
 Cleaning bottles for homebrew is not just for the taste and flavor profile of your new batch but a matter of hygiene. The brewing process requires a certain standard of hygiene. Similarly, keeping beer bottles clean and sterilized minimizes contamination risks and saves your new batch from ruining.
Therefore, reliable and effective cleaning and sanitizing methods shall be engaged for hygiene control. The intensity and method in which you sterilize beer bottles will determine the sustainability of your homebrew.


