How to Read a Hydrometer: Essential Tips and Tricks for Homebrewers
 Learning how to read a hydrometer is fundamental for any homebrewer that wants to take their practice to the next level. A hydrometer is an essential part of the equipment being used whenever anyone is making beer.
Our complete guide explores how to test or read and use the hydrometer to get your beer’s ABV.
Continue reading and you can finally start using a hydrometer for your homebrewing journey.
How To Read a Hydrometer
Once your hydrometer is all set up, you can start using it whenever you’re brewing beer to check the original and final gravity. You can follow the steps below to understand how to use and check readings with a hydrometer.
Let’s take a closer look.
– Check the Hydrometer’s Calibration
Before you use a hydrometer to see the specific gravity readings, you should first check its calibration. Since liquid, including beer, will expand or contract because of temperature changes, you need to check it at the temperature the hydrometer was designed for.
The hydrometer’s temperature is usually included in the package. In most cases, it is set between 59 and 60 degrees Fahrenheit, while the laboratory hydrometers are set at 68 degrees. If you’re using an old hydrometer, it’s best to test it first because they lose their accuracy over time.
– Check the Temperature of the Beer
The next thing to do is to check the temperature of the beer using your thermometer. If the temperature is a degree or two higher or lower than the intended value, you should write down the result and use a temperature chart to correct this.
When making your beer at home, you need to clean and sanitize the thermometer and hydrometer before sticking them into the batch.
– Pour a Beer Sample Into a Clean Container
Get a clean container like a cup or a jar that the hydrometer can float in without hitting the sides or the bottom. Then, pour some of the beer into the container, which you will then use to check the original gravity. You can do so using an auto-siphon or a baster.
Before adding the complete sample, you should rinse the container, preferably with a small amount of beer. This will help in giving a precise result once you stick the hydrometer in.
– Add and Spin the Hydrometer
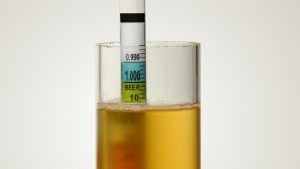
Stick the hydrometer into the liquid and ensure it’s dry before you do so. The hydrometer should float naturally without touching any sides or the bottom of the container while it settles. If it settles properly, you can ensure that the measurement will be accurate.
Don’t just leave the hydrometer sitting there, but gently spin it in the liquid. This removes the air bubbles that might latch themselves onto the instrument and affect the reading. Wait for the beer to stop moving and the bubbles to dissipate.
– Read the Scale
Check the scale at the lowest point of the liquid’s surface and look at the reading on the paper. This is different from the mark where the beer is touching the hydrometer. Instead, this is the lowest point of the beer’s surface, which will form a scale mark on your hydrometer.
– Understand the Reading
Check the value, which will show you your initial or specific gravity depending on what you are measuring. In most cases, the beer’s original gravity is between 1.030 and 1.070, although it can be higher depending on the type of beer.
You should go for hydrometers with a Balling or Brix scale to quickly understand the reading.
– Recheck After Fermentation
After fermenting the beer for a specific number of days, depending on your recipe, you can check the final gravity by following the steps above.
What You Need To Know First
Before diving into reading a hydrometer while you make your beer, there are a few things that you should learn and keep in mind. These will make it easier for you to understand the guide below.
– Temperature
The temperature of your beer is critical if you want to use a hydrometer. It is with this information that you can calibrate your hydrometer. Every brewer knows that they need a thermometer among their brewing tools, so if you don’t have one yet, better get one now.
Also, it would be best to clean the hydrometer before any reading to protect the result from any external elements or factors. You can use a clean cotton towel dipped in a soapy solution to wipe the instrument gently.
– Original Gravity
The original gravity (OG) indicates how much solid content is in the wort before fermentation turns to beer. This is what the hydrometer measures before you start fermenting the wort. Measuring with the hydrometer before and after will help in checking the fermentation.
– Final Gravity
This is the ratio of the density of the beer to water, also called gravity, at the end of fermentation. After you ferment your beer, you’re expected to use the hydrometer to test it again.
The final gravity (FG) will measure the unfermented substance, like sugar, without considering that the alcohol that has been made is lighter than water. It acts as a rough measure and can calculate the ABV with the OG.
– Specific Gravity
This is the present gravity and density of wort or beer at the standard temperature and pressure. The STP is 20 degrees Celsius and 760 mm Hg. You can also measure the specific gravity of your wort using a hydrometer.
– ABV
ABV means Alcohol by Volume, which indicates how much alcohol is displayed in a specific volume of beer. It is a global measurement standard, and the higher the value, the more alcohol there is in the beer.
How To Test a Hydrometer
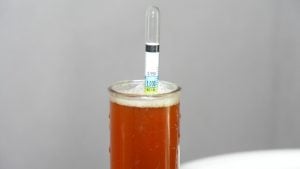 Before learning how to read specific gravity or any other gravity of your beer, you first need to test it and ensure it’s working correctly. If your hydrometer is getting its measurements wrong, you might end up changing the entire beer recipe unknowingly.
Follow these steps to test your hydrometer:
– Add Water
The first step is to fill a container with water. You should use reverse osmosis or distilled water for the best results, especially if this is what you use to brew.
If you use regular tap or bottled water to brew your beer, you can use that, but take note that the results will be altered because of the mineral content. Regardless of your choice, it will show the readings for your brew when you use that particular water.
– Set the Temperature
The next thing to do is ensure the water is at the right temperature by either cooling or heating it and checking with a thermometer. The calibrated temperature for the hydrometer will be in the instructions manual. You should ensure your water is at the exact temperature.
– Place the Hydrometer In
Now you can measure the density of your water by placing the hydrometer in. Twirl it a few times to get rid of the air bubbles and leave it to settle. If it was perfectly calibrated, the reading should be 1.000.
– Write Your Findings Down
If the result on the hydrometer is incorrect, which is any value other than 1.000, you should write it down. It either means that your hydrometer is wrong or there are minerals in your water. You will know how much to subtract or add in future readings by noting down the findings.
– Adjust the Hydrometer or Carry On
If the hydrometer is highly incorrect, not just with two or three points, this is a sign that it is off and needs to be replaced. You can decide to keep adjusting it until it’s correct or close to correct or buy a new hydrometer.
Calculate ABV
It’s straightforward to calculate the Alcohol by Volume of your beer once you have the original and final gravity, which you checked with your hydrometer. The ABV is obtained by subtracting the final gravity from the original gravity and dividing the figure by 7.362.
It is explained through this formula:
(OG – FG)/7.362 = ABV
For instance, if the original gravity of your beer is 1.045 and the final gravity is 1.012, the difference will be 33. When you divide 33 by 7.362, you get 4.482477587612062. You will approximate this to 4.5 percent.
Thus, the ABV of your beer is 4.5 percent.
What Is a Hydrometer?
A hydrometer is a measurement tool used to check the density of a liquid. It is based on the concept that suspending a solid object in a liquid will cause it to float at the same degree as the weight of the displaced liquid. In brewing, a hydrometer is used because the density of the liquid will reduce as sugar is converted to alcohol.
The hydrometer will show you the Specific Gravity of the beer, and then you can figure out what the Alcohol by Volume will be after you ferment it. The most crucial time to use a hydrometer is during the fermentation process.
This measuring tool is usually a glass rod with mercury and lead inside. It can float without sinking because of the metal inside it. The instrument also has paper glued in it which indicates the reading.
Importance of Reading a Hydrometer
It’s imperative to know how to use a hydrometer for beer, as this instrument checks the saturation and concentration of elements in the water. Brewing is a delicate process, and there are different ways everything can go wrong, especially during fermentation. This is where the hydrometer comes in.
The hydrometer will indicate whether the sugar in the wort is being converted into alcohol by the yeast. This is shown when the gravity reduces every day, and the more it falls, the more sugar is converted to alcohol. So you can be sure that your beer is fermenting and control the final gravity by stopping when you reach a particular value, thus setting your ABV.
A hydrometer works by measuring the amount of sugar in the liquid, and this sets the reading higher the more sugar is present. On the other hand, when there’s more alcohol, the reading will reduce as fermentation occurs.
Purchasing
With a hydrometer, you can decide the ABV range you want your beer to stop at. By checking the gravity with the hydrometer regularly while fermenting, you won’t only know the progress but you will also know when to stop fermenting after doing your calculations.
If you want to get the most out of your hydrometer, you should start by purchasing the right one. A triple scale hydrometer is usually recommended for anyone who uses the measuring tool while brewing. It is widely used by homebrewers and is inexpensive, so you can easily add it to your brewing kit.
You can buy the triple scale tool online or at brewing and construction stores close to you. Ensure you purchase from those made by a reliable and well-known brand. You can also check online reviews to see what other brewers have said about this instrument and if it will work for you.
Triple scale instruments are usually between $5 and $15, so you don’t have to break the bank to purchase one. It also shows the Brix or Balling scale measurement, which is the perfect tool for craft brewing. Once you buy your hydrometer, you can start brewing with it in your hands.
Conclusion and Summary
 Now that you understand how a hydrometer works, including buying the right one, testing and reading it, you can start including it in your homebrewing process.
- A hydrometer is an instrument used to measure the density of a liquid.
- In brewing, it is used to check the original and final gravity of the wort, which is how much sugars are there before and after fermentation.
- The hydrometer helps in tracking fermentation and calculating the ABV.
- Before using the hydrometer, you need to test and calibrate it first.
- Always use the hydrometer with a Brix or Balling scale, like a triple scale unit.
- Sanitize the hydrometer and thermometer before using them in your beer.
- The ABV can be computed by subtracting the FG from the OG and dividing the difference by 7.362.
- A hydrometer is a valuable tool in brewing, handy for controlling your alcohol content and tracking fermentation.
- Always read the content of the hydrometer package before using it.
With this handy information, you can purchase your hydrometer online or at a store close to you and start brewing today!

