Brew in a Bag: Learning This High-efficiency Brewing Technique
 Learning how to brew in a bag is a simple, effective and efficient beer brewing technique. This method is unique because you use a single vessel to carry out the entire brewing process. This way, homebrewers easily brew tasty and premium quality craft beers.
Read on to learn how to brew in a bag effectively.
How to Brew in a Bag: A Step-by-Step Guide
Below are stepwise directives on how to brew beer in a bag efficiently. Follow each step critically, and be rest assured of getting a delicious and high-quality craft beer:
– Step 1: Sanitize Equipment and Crush the Grains
Like other brewing styles, the first thing you want to do before engaging in BIAB brewing is clean, sanitize, and sterilize all your equipment. Since it is an all-grain brew in a bag system, the next thing is to ensure they are well crushed and ready to mix.
Crushing the grains ensures they are ready to release their starches and transform them into sugars. Suppliers could deliver these grains pre-crushed. However, you could also decide to do it yourself.
– Step 2: Calculate the Quantity of Strike Water Required
Before the brewing process, you need to calculate the quantity of strike water needed. Strike water is the water added to the crushed grain to transform it into a mash. The calculation is simple, especially if you carefully follow the illustration below.
However, for those who find mathematics difficult or have problems with anything relating to calculation. You could use the biab calculator. It aids in simplifying the calculation.
-
How to Calculate the Volume of Strike Water Needed?
Before calculating the volume of strike water, you need to calculate your pre-boil volume. The value you get would then be used to calculate the strike water volume.
To calculate this, you would use the following variables:
- Total weight of grain to be used.
- The grain’s absorption rate. This is often between 0.1 and 0.125 gallons per pound of grain.
- Bill-off rate. This is the rate at which water is lost during boiling. Although it is not a constant value, you would figure it out after a few brews.
For example, let’s use brew in a bag recipe that calls for a finished batch size of five gallons of beer. With the variables you have, you can calculate the pre-boil volume.
- Total weight of grain = 11.5 pounds
- Grain absorption = 0.125 gallons per pound of grain
- Boil-off rate = One gallon per hour.
- Boil time = One hour.
- Desired batch volume = Five gallons
The formulae for the pre-boil volume is: (Boil time x Boil-off rate) + Batch Volume
That is: (1 x 1) + 5 = 6.
This means you need a pre-boil volume of six gallons to brew five gallons of beer. You can now calculate the strike water volume needed for this brew.
The formula is: (Grain absorption rate x total weight of grain) + pre-boil volume
That is: (0.125 x 11.5) + 6 = 8.62
Thus, you would need to add 8.62 gallons of strike water to your grains to brew the said five-gallon batch of beer.
– Step 3: Make a Mash
After calculating the strike water volume, the rest of the process is pretty easy. The next thing to do is to make the mash. Heat the strike water at a slightly higher temperature than your desired mash temperature. For example, if you target 150 F, you could heat up to 155 degrees.
 The mash you’d get would be a very thin one since the whole volume of hot liquor would be added. The next thing is to place your brew bag in the kettle. To prevent the bags from touching the base of the kettle. Secure the bag to the edge of the kettle’s top with the aid of clips. At this stage, ensure you have your pair of brewer’s gloves on your hands for safety.
Add your grains quickly, but take great care. Stirring is important, as you do not want the formation of dough balls. Hence, the need to stir the mash properly but carefully.
– Step 4: Monitor and Regulate Temperature
When adding the grains, there is usually a drop in temperature. Hence, the need to monitor the temperature changes. Use a thermometer to monitor and regulate the mash temperature. If it’s too hot, you could add ice. If otherwise, increase the heat. Just make sure that the temperature is regulated.
Afterward, remove your kettle from the heat source and keep it insulated for a period of 60 to 90 minutes. This time is dependent on the recipe used for brewing.
– Step 5: Drain the Worts
The next thing is to remove the grains after the 60 (or 90 minutes) mark. Hoist the bag to allow all worts to drain off the bag. This should not take more than 10 to 15 minutes. You could gently squeeze the bags, wearing your brewer’s bag. Just ensure that no grain escapes the bag.
Once you are done with draining, you do not need the grain anymore. You can dispose of it or keep it for reuse or something else. It could serve as components for compost manure or as animal feed. You can then go on to rinse the bag and dry it.
If you intend to add hops during boiling rather than dry-hopping, use the bag to hold the hops. Although, you need to remember that the earlier you add the hops, the more it expresses its bittering qualities over other flavors.
– Step 6: Heat the Worts
After collecting your wort, heating again is the next thing. Boil for 60 to 90 minutes, as specified by the recipe you’re using. You can then add the hops during boiling.
Note that the time you add your hop (before, midway, or at the end of boiling) is critical to the flavor and aroma it presents to your brew. You could follow the hop directives if you are unsure when to add them.
Suppose you are using your brew bag to add the hops to the boil. In that case, you need to prevent the bag from touching the base or sides of the kettle. One way of doing this is to use a hop spider. This will ensure that adding the hops to the brew is neatly done, and there is no risk of scorching the bag.
– Step 7: Remove Your Hops, Cool, and Transfer to the Fermenter
After boiling the wort, you are basically done with your brew in a bag. Switch off the heat source and remove your hops. Then allow it to cool.
Ensure that whatever is coming in contact with the wort from here is properly sanitized. This reduces any risk of contamination as there is no longer any form of heating.
The next thing is to transfer the cooled wort into the fermenter. Note the specific gravity of the beer. To do this, take enough quantity of your brew and obtain this value using a hydrometer. The value obtained is your original specific gravity.
– Step 8: Ferment Your Beer
With your beer already in the fermenter, the next thing is pitching. This involved the addition of yeast to your brew (wort) to kick start fermentation. Ensure the container holding the yeast is also sterile. At this point, it is safest to avoid any means of contamination. After pitching, seal the fermenter with a sterile, airtight cover.
After sealing, shake the fermenter for about two minutes. This would yield oxygen that helps increase yeast growth, leading to quick and effective fermentation. The next thing is to wait until fermentation is complete.
– Step 9: Monitor Fermentation and Package Your Beer
Keep the fermenter containing your brew in a cool place. Monitor fermentation from time to time till it’s complete. You can monitor fermentation by taking specific gravity readings from time to time.
Fermentation is only complete when there is no significant change in the readings after taking it some two to three days apart. When you have consistent reading, it is at this time you know your beer is fully fermented.
With your brew fully fermented, the brew in a bag technique is complete. Packaging your brew is the next line of action. Bottling or kegging is the go-to package for craft beers. Pour yourself a glass of your beer to savor its greatness!
What Is Brew in a Bag?
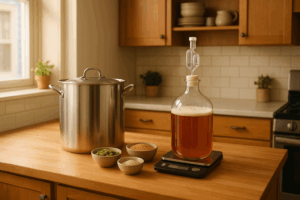
Brew in a bag is an all-grain brewing technique that involves performing all brewing operations such as mashing, boiling, etc., in a single vessel. It is often seen as an easy route to overcome the complexities of homebrewing. All grain brew in a bag offers several benefits to homebrewers, requiring little knowledge and only a few brewing equipment.
It is a simpler yet efficient technique for homebrewers, gaining incredible popularity since its introduction about a decade ago. Lots of homebrewers and microbreweries all over the world are switching from the traditional brewing technique to BIAB.
Besides the simplicity of using this brewing technique, it is time-saving. You can save significant time using the BIAB technique. Furthermore, less equipment is needed to run an effective home brewery or microbrewery. It also gives room to play around with different ingredients.
What You Need To Brew in a Bag?
The essential tools in the brew in a bag system are a large brew kettle, brewing bag, thermometer, brewer’s glove, hydrometer, and leverage to lift the brew bag during draining.
– Brew Kettle
The brew kettle for effective brewing in a bag has to be large. It has to be larger than those you would normally use for brewing with traditional methods. Remember, the brew kettle for BIAB is basically a universal vessel (pot). Your mashing and boiling happen in this single vessel.
If you intend to brew a five-gallon batch of brew, you’d need a 10 to 15-gallon brew kettle. The larger the size, the better.
The question then is, why?
Your brew kettle should provide enough room for the pre-boil recipe and the volume of wort you need to boil before transferring them to the fermenter after cooling.
– Brewing Bag
The brewing bag and the brew kettle (or pot, as you may choose to call it) are the two most important pieces of equipment for BIAB. Experts produce several affordable reusable bags. However, some homebrewers decide to make their own bags using cotton or nylon materials.
Whether creating or purchasing the bag, just ensure that what you are using is strong enough to hold the grain. Also, it must be large enough to fit your brew kettle perfectly. It is of utmost importance that the bag conveniently fits the kettle without touching the kettle’s base. Not allowing the bag to touch the kettle is one secret to brew in a bag efficiency.
Contacting the kettle’s base (hot metal) will scorch the grains or melt the bag itself. This will have a deleterious effect on the brew to be produced. If the plan is to brew a beer of great taste and top quality, it is essential to prevent this.
– Thermometer
Temperature estimation should be the least of your worries when brewing in a bag. A thermometer comes in handy here. Temperature accuracy might be the difference between a great craft beer and a not-so-good one. Target mash and strike temperatures are easily obtained with the aid of your thermometer.
– Brewer’s Glove
Safety is key!
Hence, the need to protect oneself. We recommend a brewer’s glove and not just your regular glove. This is because a brewer’s glove does more than protect your hands; it also the forearms. You need adequate protection when handling the hot brew kettle or squeezing the brew bag. A brew glove would come in handy.
– Hydrometer
A hydrometer is an instrument used in measuring specific gravity. With the aid of this instrument, you can easily obtain readings of the original and final special gravity of your brew. This information will help you know when fermentation is complete.
– Leverage To Lift Brew Bag
Remember, we said the brew bag should not touch the bottom of the kettle. To prevent this, you can use clips or bungee cords to hold the bag to the edge of the kettle. During draining, leverage should be your go-to option. It could be in the form of a tripod to hold the bag in place as the wort drains from the bag into our brew kettle.
The right all-grain beer recipe and ingredients are also of great importance. After all, without them, even with all other beer brewing equipment, we have no brew. Virtually every standard all-grain recipe would give good results when you brew beer in a bag. Just ensure you have all the necessary ingredients and tools.
Then, go on brewing!
How To Increase Mash Efficiency
Here are some tips to help you increase mash efficiency when you carry out brew in a bag:
- Run the grains through milling twice for easier extraction of converted sugars.
- Increase the duration of mash rest for more conversion.
- Use the right bag material.
- Carry out sparging to ensure complete rinsing of all the sugars out of the mashed grains.
- Make recipe calculations with lower expected efficiency.
This will help you get efficiencies close to the traditional mashing forms with the range of 70 to 80 percentile.
FAQ
Is brew in a bag the same as an all grain?
No, brew in a bag is a method of all-grain brewing that involves mashing and filtering the grains in a bag, rather than using a traditional mash tun.
Do you need to sparge with brew in a bag?
No, sparging is not necessary with brew in a bag since the bag itself acts as a filter and allows for easy removal of the grains.
Can you boil a brew bag?
Yes, you can boil a brew bag. In fact, the bag can be left in the boiling wort during the boil to add additional flavor and aroma to the beer.
Conclusion
 With the aid of this well-detailed article, you should be able to attempt and produce a great and quality beer using the brew in a bag technique. Let’s briefly go over all that was discussed in the article:
- The main equipment needed to engage in the BIAB brewing technique is your brew (vessel) kettle and the brewing bag.
- Other necessary equipment for smooth and easy brewing via this technique include a thermometer, hydrometer, brewer’s glove, and leverage to hold the bag when draining.
- The first step to brewing in a bag is to sanitize the equipment, crush the grains, and brew properly.
- You also need to calculate the strike water volume you need. Then, you make a mash.
- Drain the mash. Heat the wort before adding the desired amount of hops and boiling for about 60 to 90 minutes.
- After brewing your beer in a bag, the next step is to allow fermentation to take place. Then proceed to package the beer. You could decide to keep your beer for personal enjoyment with family and friends or put it out for sale.
Brewing a high-class beer using the BIAB technique would be as easy when you follow these steps. If you hit a roadblock as you attempt to brew your beer using this technique, do not hesitate to refer to this article.