Yeast Starter: Make Unlimited Beer Batches With Our Homemade Recipe
 A yeast starter is an indispensable part of modern brewing. Whether you are an experienced commercial brewer or an amateur about to begin your brewing journey, we all know that a good mix of beer needs a yeast starter.
While commercial brands already know the trick, today, we will share the ultimate recipe to make yeast starter at home and brew the perfect beer bottle with its help.
What Is a Yeast Starter
A yeast starter is a special type of solution, similar to beer, that is made to help the yeast cells reproduce. Although it might resemble a brewed batch of beer, it’s not suitable for drinking. Its only purpose is to ferment the beer and make it ready to drink.
In fact when you are brewing beer, you focus on the taste and aroma of the beverage too, whereas when you are making a yeast starter, your only focus is to grow healthy yeast that will help you produce more batches of beer.
Understand Whether or Not You Require a Yeast Starter
Before you get started, think about whether or not a homebrew yeast starter would help the brew you are preparing. When you start brewing yeast starter with wort, you are essentially making a sugary mixture that will be used later.
Brewing a limited quantity of wort a day or two before starting your major brew will yield a good amount of yeast. The waiting period gives the yeast cells time to proliferate and acclimate to their new environment before fermenting the beer.
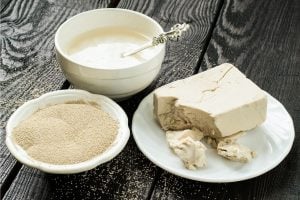
Also, dry yeast, which is rich in living yeast cells, will usually eliminate the need for a starter completely. Just make sure you preserve it well.
After all, liquid yeast starter has fewer cells, approximately 100 billion, compared to 200 billion yeast cells in dry yeast. Hence, dry yeast can function without a starter, unlike liquid yeast.
Why Should You Make Your Own Yeast Starter
Since yeast starters are readily available in stores, you might doubt the need of creating a yeast starter from scratch. To be fair, commercial yeast starters are equally good, but homemade starters indeed bring more benefits to the table. Learn what they are in this section.
– Pocket-friendly
One of the biggest reasons you should make a yeast starter at home is to save a few extra bucks. Since making it at home is comparatively cheaper, you can also afford to make some extra.
The benefit of having extra yeast is you can ensure complete fermentation of your beer. The more the yeast, the better the fermentation. And needless to say, efficient fermentation will produce the best-in-class beer.
– Yeast Quality
If you have just begun your beer brewing journey, you are more vulnerable to yeast-related scams. Yeasts are living organisms that need to be alive to ferment your beer. While a store might accidentally or intentionally sell you dead yeast, you will surely know it when you begin making the starter.
The advantage here is, if you bought the yeast directly from the store while making a 5-gallon batch and found out the yeast is dead, you would have to put the whole batch on hold. But with yeast starters, you will know if it’s fit for use right at the beginning of the brewing process.
– Activate Dormant Yeast
If you already have a batch of dormant yeast sitting in your refrigerator, why bother going to the store to buy a fresh batch? Simply make a quick yeast starter at home and activate the dormant batch. The starter will quickly make the yeast cells multiply and prepare them for fermentation.
This starter can be used to make unlimited yeast cells for free, which will ensure that your beer gets its authentic taste and aroma.
How To Make Yeast Starter?
Making a yeast starter is pretty simple. The initial steps are almost similar to making beer. No wonder they look so similar. Just follow these steps closely to make the perfect yeast starter for your home-brewed beer.
– Prepare the Wort
An all grain yeast starter will be prepared from wort. And, to make wort, you will need a malted cereal of your choice.
- Wash the cereals well and separate the husk from the grain. This will expose the cereal’s starch content, which is about to form the base of your beer.
- Next, you need to mash the grains in water and leave it soaking in it. This will activate enzymes that will convert the starch in the malted grains into sugar which will, in turn, dissolve in the water.
Sometimes, to accelerate the process, you might need to heat the mix periodically. This will enhance the enzyme activity and increase the rate of conversion.
You will soon notice that all the water content from the mashed grains has seeped out. You need to filter out the water carefully. The solid mass of mashed grains that is left behind is known as “Wort”.
– Sanitize All Your Equipment
 Wort is a highly sweet substance that attracts many hazardous bacteria and germs. They may end up in the mix and pose a severe health risk to the consumer. The taste of your beer will be affected in the presence of these unwanted microorganisms.
So, make sure that everything in your workstation is immaculately clean to avoid this situation. Cleansing and drying the equipment properly is step one in the cleaning process. Later, disinfect anything that will come into contact with your yeast starter using a brewer’s sanitizing agent.
– Get Your Yeast Ready
The majority of liquid yeast starters are packaged. To activate the yeast, you only need to give it a good, forceful smack on the bottom of the yeast pack.
After that, use your fingertips to gently massage it between your fingers and then leave it to incubate for a couple of hours.
Meanwhile, determine how you’ll boil the wort. It can be boiled directly in the Erlenmeyer flask if the flask is large enough and you have a gas stove.
Boiling is essential, especially if you plan to store it in an airtight container, like an amber jar or bottle.
– Start by Preparing the Wort
After that, you’ll need to fill a 0.4-gallon (1.5-liter) container with water, preferably filtered water. Beer made with filtered water will keep any undesirable flavors from the tap water from migrating to your beer.
- So, fill your flask or pan halfway with water and set it aside.
- Next, add one glass of dry malt extracts and one cup of water to a separate mixing dish and stir it well. Continue to cook and stir until the dry malt extract has completely disintegrated.
- After that, you can remove it from the heat and set it aside.
To pour the mix into the container, we recommend you get a funnel. Prepare your container by wrapping it in aluminum foil. Since the brew will be boiling, be careful with the mix, or you could inadvertently burn your hand with the steam.
– Allow the Wort To Cool
To prevent the wort from fermenting any further, you need to cool it down as soon as you can.
- This can be done by filling your sink halfway with cold water and placing the flask or pan inside it. Wait until the bottle is cold (about 80 degrees Fahrenheit) before continuing. To expedite the procedure, add salt and ice to the beaker containing it before stirring it.
- A layer of salt on top of the ice will protect it from melting and extend its life. While you wait for the wort to reach the pitching temperature, sterilize the yeast pack, scissors, and foam stopper.
- Open your yeast packet with a pair of disinfected scissors and add it to the brew.
- Finally, use your foam stopper to secure the jar.
For the next 12 to 24 hours, you’ll need to keep your yeast cells in the incubator. During this period, the cells will divide and grow. You can utilize your liquid yeast starter right away after the operation is complete.
When you decant yeast starter, it will seem a little foggy while incubated, indicating that it is working. After reaching this point, the fluid will be nearly transparent, with an abundance of yeast covering the bottom of the bottle.
Lifting the container and swirling it will help to eliminate odors. It will also help remove the yeast cells that may have gathered at the bottom of the container during the fermentation process.
Equipment for Yeast Starter?
In the section below, you will find a list of the necessary equipment for making yeast starter at home, depending on your specific needs.
– For Storing
Essentially, when generating a yeast starter, you’re creating a tiny batch of beer and letting it ferment. To make the starter, you’ll need to have a vessel big enough to accommodate the volume of the starter and something to cover the top, such as aluminum foil or a rubber stopper.
– For Boiling
You’ll also need a pot large enough to boil a tiny amount of wort for your experiment. Aside from that, you’ll also require water, dry malt extract, and a sanitizer to complete the project. To ensure that oxygen is continuously introduced into the starter, you should use a stir plate. This is critical in the process of increasing the yeast cellular components in a starter.
Simply shaking the jar now and then is preferable to not introducing any oxygen at all when a stir plate isn’t available.
– Defining the Optimum Number of Yeast Cells
When creating a yeast starter, it is critical to have a goal quantity of viable yeast cells in mind. This is calculated by the volume of the beer batch in comparison to the initial gravity. To make an ale, you’ll need about 0.75 million viable yeast cells for each milliliter of wort per degree Plato. For a lager, instead, you’ll need about 1.5 million viable yeast cells for each milliliter of wort per degree Plato.
Calculating the Gravity, Temperature, and Volume of a Starting Material.
Here are a few tips for ensuring that temperature, gravity and volume are just on point!
Temperature
Yeast starters should be kept at around 72 F (22 C) in general, with ales and lagers permitted to be a few degrees hotter and a few degrees lower, respectively.
Gravity
Aim for gravity in the range of 1.030–1.040, encouraging steady growth without bringing excessive amounts of unwanted stress to the environment.
Volume
Determining the capacity of a container can be a time-consuming operation. Depending on how much starter is used and how many viable yeast cells are added, this is referred to as the inoculation rate, and it will define the potential for growth of the yeast starter.
FAQ
How long before brewing should I make a yeast starter?
It’s suggested to make a yeast starter 1-2 days before brewing to allow enough time for propagation.
Do you need a yeast starter for dry yeast?
Yes, it’s recommended to use a yeast starter for dry yeast to ensure optimal fermentation.
How long can a yeast starter last?
A yeast starter can last up to 1 week if stored properly in the refrigerator, but it’s best to use it within 24-48 hours for best results.
Conclusion
 The quality of your beer depends on how well you brew and ferment it. Its fermentation efficiency depends on the yeast you use. That’s why preparing the perfect yeast starter mix is crucial to make the perfect batch of tasteful beer. Just follow our recipe and instructions, and we guarantee you will master the art of brewing beer at home in no time.


